- By: Mike LaLonde
- April 09, 2019
Free Google Grants for Nonprofits Tool – Google Docs Sheet to Help Build or Edit Your Account
Over the years, we’ve worked with a lot of nonprofits interested in utilizing the Google Ad Grants program that is offered to eligible companies. Though a lot more restrictive than it used to be, it can still be a very valuable resource for nonprofit organizations when utilized correctly. The problem is, it’s not exactly easy to use.
It’s commonplace for nonprofit employees to wear many hats, and learning Google Ads to take advantage of the program is no easy undertaking. That’s why we offer affordable packages and discounts for Google Grants accounts, starting with our Google Grants compliance package at $79/month and scaling up as needed.
While we frequently execute research and setups for clients who go on that package, on an ongoing basis we give nonprofits a lot of control over keywords they want to add and ads they want to run. We provide the tools to help them easily and effectively create those items while following the rules for Google Ads. Then, we take this information and implement it on the account.
If you’re a real do-it-yourselfer, get excited, because we actually share the account updating tool with any nonprofit who would like to use it. Built from Excel and exported to Google Docs (which limits some of the functionality, but it’s still pretty good), the document makes uploading the information to Google Ads Editor very easily and efficient. Some knowledge of Editor is still required of course, so you’ll probably still need to do a few tutorials in order to effectively use the spreadsheet to upload your changes.
Without further ado, here’s the Google Grants Template Document (Public Google Doc).
Here’s a quick guide on the different tabs.
Instructions
The document uses background colors to show the editing options on each cell. What you can, can’t, or need to fill out if you want things to import into Google Ads editor and post without breaking any rules. Essentially, make sure you fill out all the grey cells. The pink cells allow you to get a bit more specific or add additional information, but they don’t need to be used to apply to your account in an effective manner.
Campaigns-AdGroups-Keywords
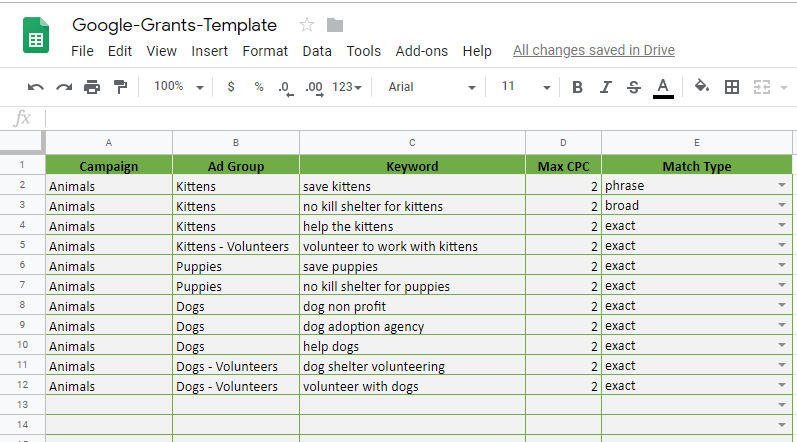
Here’s an area where you’ll need a bit of Google Ads knowledge in order to effectively implement the sheet. When building an account in Google Ads, we’ve found it’s best for users to set up the new campaign in the Google Ads interface, which helps you make all the appropriate targeting selections in a more user-friendly way. Once the “shell” of those campaigns are created (usually Grants accounts only use a campaign or two), you’ll want to use the exact Campaign Name in the Campaign column.
If you import Keywords to Google Ads, Ad Groups will automatically be created as you’ve specified on the document. You don’t need to create Ad Groups first, and then Keywords, which is why it’s all on the same tab. Once they are imported, you’ll need to set a default bid ($2 is fine), as that is a required field.
This document assumes a basic knowledge of setting up account structures, including how to use ad groups to organize your keywords. Remember, you create ads on the Ad Group level.
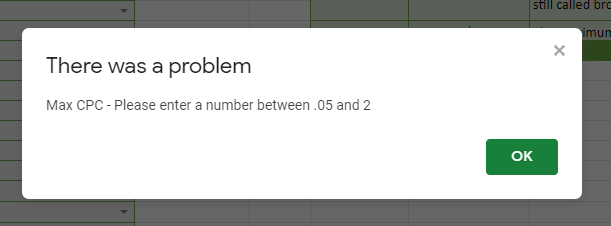
The Max CPC is almost always just set at $2, especially now as driving traffic is getting more difficult and fewer accounts hit their full grant allotment. You can use a different bidding model to “remove the $2 Max CPC” as Google puts it, but honestly it’s just a ploy to test their conversion optimization model. Try it if you’d like, but so far we haven’t been impressed.
The “Match Type” makes sure you specify an actual Match Type that Google will recognize. For Google Grants, we typically recommend Broad Match, as it casts the widest net, but feel free to use multiple match types.
Negative Keywords
Don’t want your ad to show up for certain keywords? This is where you can list those. Then, you can import them on the Campaign or Ad Group level, or use a Negative Keyword List through the interface (this is what we recommend).
Responsive Ads
Not all accounts are eligible to run Responsive Ads. They are still technically in Beta, but if they start being used more frequently, this tab will come in handy. The Google Doc has limitations here – our Excel spreadsheet checks your Campaign and Ad Group listings to make sure they are listed on the previous sheet (e-mail us if you want the Excel doc), but as long as you make sure they match you’ll be fine.
Add up to 15 Headlines and 4 Descriptions. Our sheet checks the length of each cell and let’s you know if you’re over, or how much room you’ve got left to add. The same goes for your Paths. Google will display a combination of Headlines and Descriptions that it feels will perform the best for each Search Query if you use this ad type.
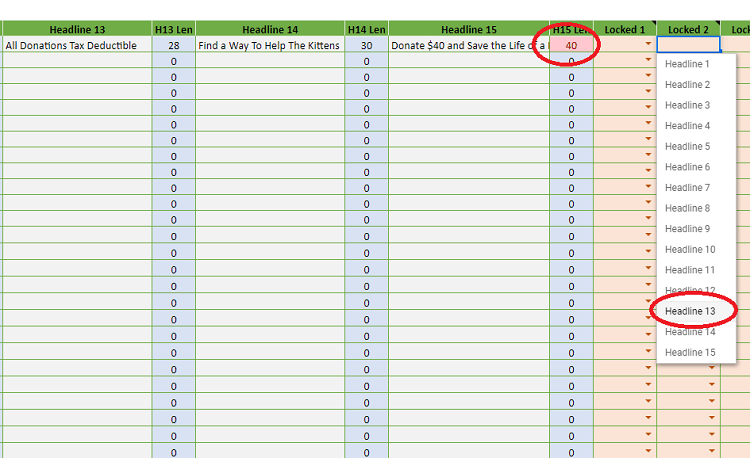
Using the “Locked” drop-downs, you can also choose if you want to lock certain headlines into certain Headline rows (Google displays up to 3). Those are optional, but if you want to make sure a certain Headline shows up, that’s where you can do it.

Headline 15 is too long (40 characters). This would lock Headline 13 into the 3rd Headline position.
Expanded Ads
These use the same structure as Responsive Ads, but this time you’re specifying exactly how the ad will show up. These are the most common type of ad.
Note: For extensions, it’s common for Google Grants users to just apply them on the account level. However, if you have several unique areas in your business then you might want to apply all or some of them on the Campaign or Ad Group level. As a general rule, the more specific you can be the better, so it’s good practice to do that when possible, but it isn’t obligatory.
Sitelink Extensions
This allows the possibility of links to other sections of your website to show up just below the main part of your ad. Just the Link Text and URL are required here, although you do have to apply them at a certain level (Account, Campaign, or Ad Group). That decision has to be made as you’re uploading to Google Ads Editor.

This is how your sheet might look. Descriptions are optional, but if you fill out one you MUST fill out both. Note Description 2 for Volunteers is too long and would need to be shortened.
Callout Extensions
Callout Extensions show up as unlinked text similar to Sitelink extensions. They are used in the same way – just the text is required and you can apply it at different levels.
Structured Snippet Extensions
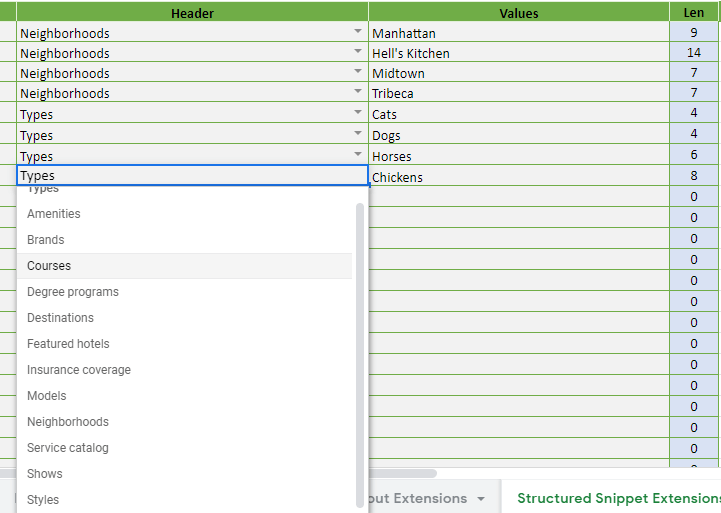
These are a bit more complicated, but allow you to provide details of your product or service offerings. The top of the sheet displays all the different options for the Header, and the main area requires you specify one of them exactly for it to import properly. List one value per row, and then upload them on the level you desire.
Call Extensions & Location Extensions
These extensions are imported through your Google My Business account. Make sure the same Google Account has access to both your Google Business and Google Ads account, and you’ll be able to import these. Once that’s done, you can apply them at different levels.
Can This Be Used for Paid Google Ads Accounts?
Sure! But the strategy for paid accounts is a lot more nuanced. There’s much more incentive to create granular campaigns, making the Campaign-AdGroup-Keyword sheet much more complex, which is really why a new build should be handled by a professional. Plus, this template doesn’t let you bid over $2. If you make a copy of the sheet and remove that restriction, this can more or less be used on any account.
However, it was designed for the simpler structure that Google Grants accounts typically wield. I’ll be clear: I would not recommend using just this sheet to build a paid Google Ads account, as it simplifies things too much for my liking. But in theory, it will work just fine, as paid accounts have the same character limits and fields as grant accounts (with the exception of what I mentioned above).
This is Still Too Complicated!!!!
Once you’ve filled out this sheet, it still requires a functional knowledge of Google Ads Editor. Which isn’t easy. That’s why we provide Google Grants clients with this sheet so they can do most of the work, because we’re really good at taking the spreadsheet and preparing it for upload. That’s how we’re able to offer our compliance package at only $79/month, providing nonprofits with a way to manage campaigns effectively with the help of a professional without breaking the bank.
RELATED POSTS
- Google Grants: How Google Killed Non-Profits by Giving them Twice as Much Money
- Establishing Client/Agency Relationships in Google Ads, Analytics, Search Console, and Tag Manager
- 7 Uses for Enhanced Sitelink Extensions in Google Adwords
- A Guide to Google Adwords Extensions: Enhance Your PPC Campaigns


