- By: Mike LaLonde
- July 31, 2023
GA4 Setup Process – 10 Steps to an Effective Setup or Migration to Google Analytics 4
Setting up analytics – GA4 these days – is an important step of any new website or redesign launch. For both clients and partners, we execute a lot of GA4 setups, here we’ll share the basic process for getting simple, but effective tracking set up using GA4 and Google Tag Manager.
Step 1: Functionality Requests & Defining Tracking Needs
The first step is understanding what the client wants to track. Pageviews are already automatically tracked, and now there are some new automatic tracking events set up thanks to GA4, such as scrolling, file downloads, outclicks, form submissions, and a few video events. And while those are nice, they’re not comprehensive and are often a bit too general to use effectively. So, we ask clients to write out anything that is important for them to know that isn’t a pageview (even if it’s captured by one of the new, automated events somehow). While we know a lot of what they’d want to set up, this helps us discover any hidden pages or efforts that may not be obvious from browsing the main website.
That could mean contact form fills, clicks on emails, clicks on phone numbers, PDF downloads, landing page forms, newsletter forms, clicks on key assets, time spent on a specific page, or any other action that isn’t a pageview.
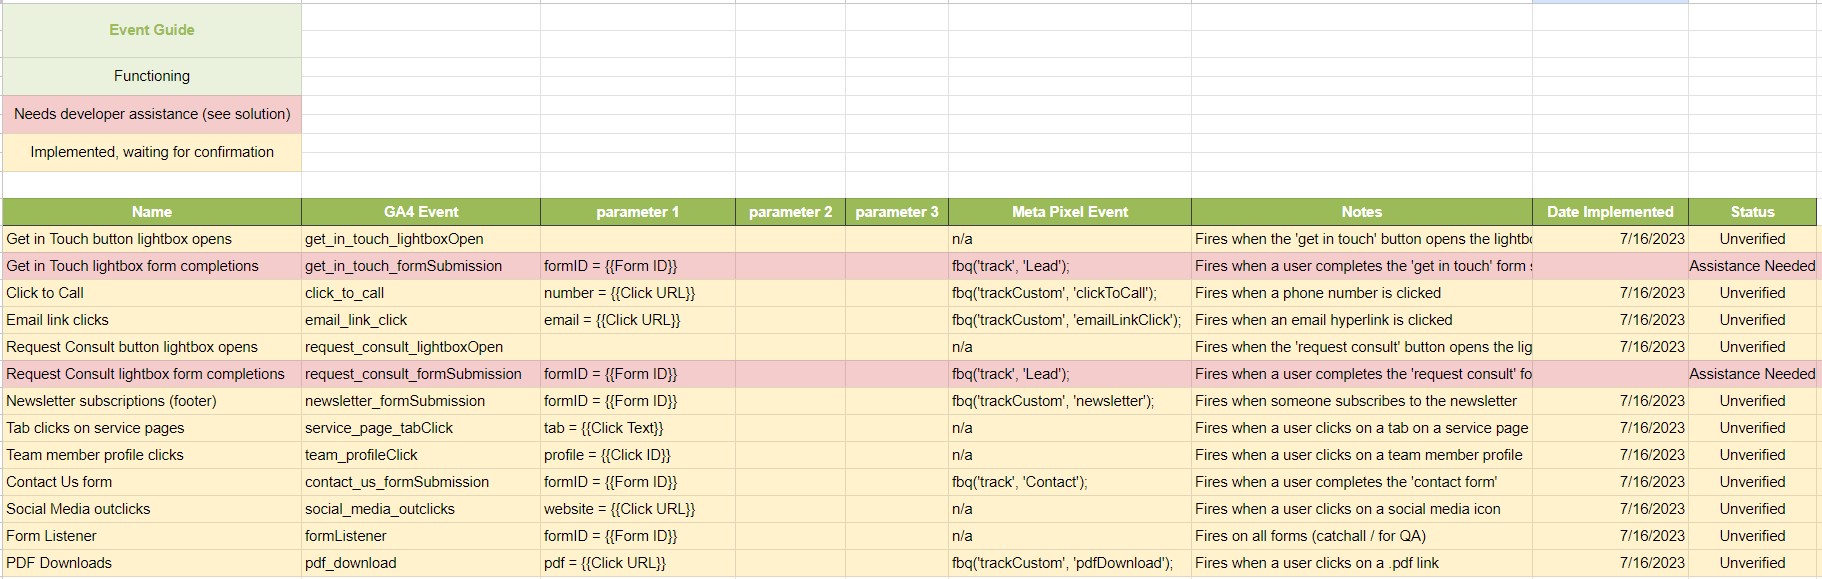
As an example, we’re going to walk through a new setup for our own website here. It’s also a migration since we tracked the same things using UA. Here’s a list of the tracking functionality we wanted, which tracks the same kind of things most lead generation companies are going to want to track.
(click to enlarge)
Step 2: Consultant Additions & UA -> GA4 Migration
We’ve been working with Google Analytics for over 15 years at this point and seen it all when it comes to various tracking setups. A client list will help discover everything they find important, but we add anything else that is simple and interesting that they don’t include on the list. After all, we’re hired in part to help track what is important, so we set up functionality as comprehensively as possible just in case a client may want to analyze something else in the future.
During a migration to GA4, this is also a great time to look at current tracking, which you can usually get a pretty good idea of by looking through Universal Analytics (UA) and Google Tag Manager (GTM). If there’s anything interesting there that should be migrated over, add it to the “Tracking Need” list. Optionally, we add a “Requested By” column (and possibly a “Requested Date”) to this spreadsheet to keep track of whether it’s something a client requested or something we’ve added separately.
Since we’re doing this ourselves, we really didn’t miss much, but I did add in those optional columns.
(click to enlarge)
Step 3: Solution Planning
Next, we figure out the best way to track everything that has been requested. We use Google Tag Manager for all our implementation, so as long as GTM can pick up some kind of trigger on the website, we’re in for a pretty straight-forward implementation.
Since lightboxes open on top of the primary website layer, actions within them don’t register GTM events. That’s problematic and requires additional functionality. So, we’ve made this a bit more difficult for ourselves, but if the website doesn’t have any major actions within lightboxes, usually everything can be done without backend access or developer intervention. That is assuming we’re not executing advanced tracking with CRM integrations, real-time lead scoring, or other non-click information.
(click to enlarge)
Hint: Naming Conventions
We try to use consistent, predictable event naming to help with report creation and filtering when it comes to analyzing data. That’s why you’ll see standardized parts of our naming convention, such as using “formSubmission” at the end of any form submission. This may seem obvious, but many omit it, making reporting difficult later.
Implementing in this way allows us to report on things like “all events including formSubmission” in addition to the individual conversion breakdowns. It also allows us to easily filter based on the start of the event name (often location), such as “show me all the events including get_in_touch“. Again, this allows for easier filtering and funnel building.
Step 4: Event Setups & Implementation with Google Tag Manager (GTM)
Now it’s time to get the actual work done. This isn’t a tutorial on how to use Google Tag Manager, so we’re not going to go through step-by-step here, suffice to say that we recreate everything on the functionality tab in GTM. We start by copying over the list created on the functionality tab to the Events tab in our Google Spreadsheet, then filling it in as we set up the Tags and Triggers via GTM.
(click to enlarge)
This screenshot is from our initial run through where we implement everything we can using GTM alone. In many cases, this will complete this portion of the setup. In other cases, as we see here, some additional assistance is needed to track some events that we’re not able to track strictly through GTM. Some common forms, like Contact Form 7 and Gravity Forms (both are common WordPress form plugins), may require additional settings to track properly with GTM. There are already some solid resources out there on what edits are necessary to get them to fire a custom event. That custom event can then be used as a trigger instead of typical click and form submission triggers (see the “solution” from the Functionality tab).
Hint: Parameters
Parameters are additional bits of information that we can pass with the regular event into GA4. In the next step, we’ll cover how to add these to GA4, but for now just know that we’re feeding additional information here that provides more insights into the individual events. This helps manage data at scale much easier. Rather than creating 5 different events for each of our social media outclick buttons, each named for the specific social media website, we can instead create one event with a parameter that displays the URL, allowing us to differentiate between each button.
Unless these are defined as Custom Dimensions (see step 5), you’ll need to export them using BigQuery to analyze them properly. They aren’t easily accessible within the default GA4 interface.
Hint: Meta Pixel Events
If you do any Meta advertising, you’ll want to set up conversion tracking for that platform as well. In the example above, you can see what standard and custom Meta Pixel events we’ve used for each of the events. These can also be implemented via GTM using the same triggers.
Step 5: Custom Dimensions in GA4
We talked about the parameters that are added to the GA4 events above, and this is where we make use of them. Since they are not shown by default in GA4 (you’d need to export to BigQuery to view and manipulate data), we need to force it to show up by defining these parameters as Custom Dimensions. That can be done in the Admin area, under Admin -> Custom Definitions. We’ll add each of the parameters as an Event-scoped Custom Dimension.
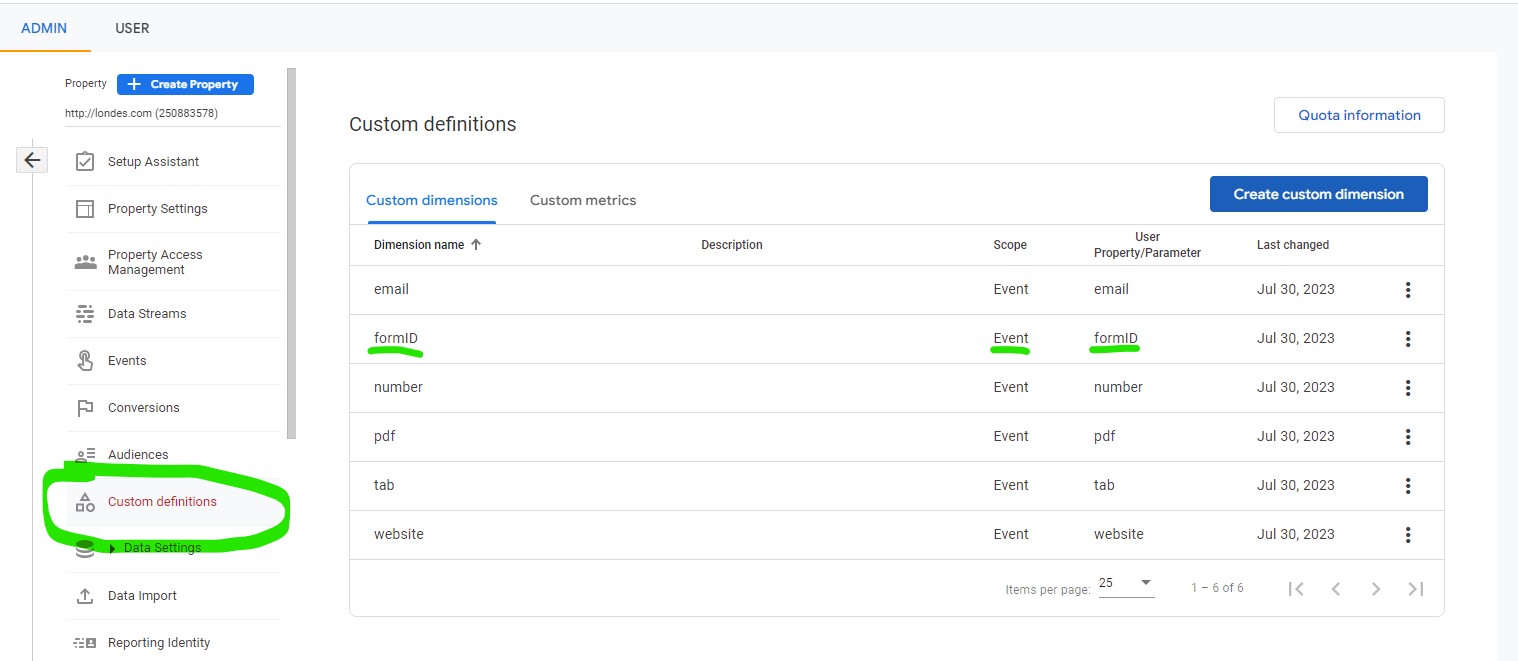
(click to enlarge)
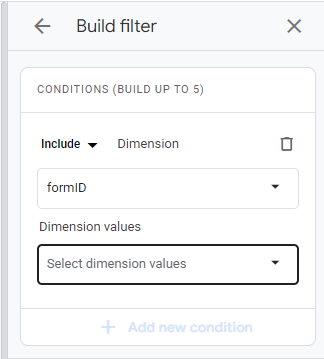
Now, you can filter for certain Custom Dimensions (parameter values) in standard areas of GA4:
(click to enlarge)
This makes the data much more accessible in the standard reporting within GA4. It also allows you to use these dimensions and metrics in Looker Studio (formerly Google Data Studio) reporting, which is extremely important when it comes to GA4. So, it’s a standard part of all our setups.
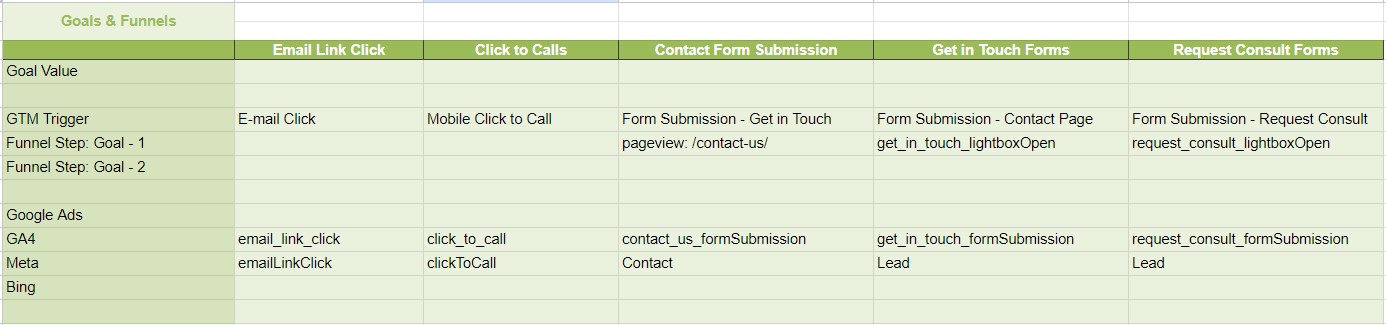
Step 6: Define Conversions
Just because we’re tracking something as an event doesn’t mean it should be a conversion. Clicks on our team’s profiles are interesting, but they certainly aren’t conversions. Here is where we separate that. On our next tab in our Google Doc, we define what constitutes a goal, and any funnel that is associated with it. In our example, we define 5 conversions, three of which have a funnel step we can define before the conversion happens.
(click to enlarge)
On this sheet, we also have a space for Goal Value. If you want to define relative values for goals, that can be done with default values entered into the GA4 events. For example, if a Request Consult form is worth 5 times more than a general Contact Form submission, you could define the former to have a value of 5 and the latter a value of 1. Of course, that would all need to be relative to the rest of the events. This allows you to report and optimize based on lead value rather than just lead quantity. Here’s a little more on why we think that’s so important.
Below the primary trigger definitions, we show how you’re tracking that goal in major acquisition channels.
As far as defining the conversions in GA4 goes, it’s actually very simple once the events have all been set up and are correctly being displayed in GA4. In the Admin area, navigate to Events, then flip on any events that you want to track as a conversion. Once that’s done, they should show up in the Conversions tab, located just below the events.
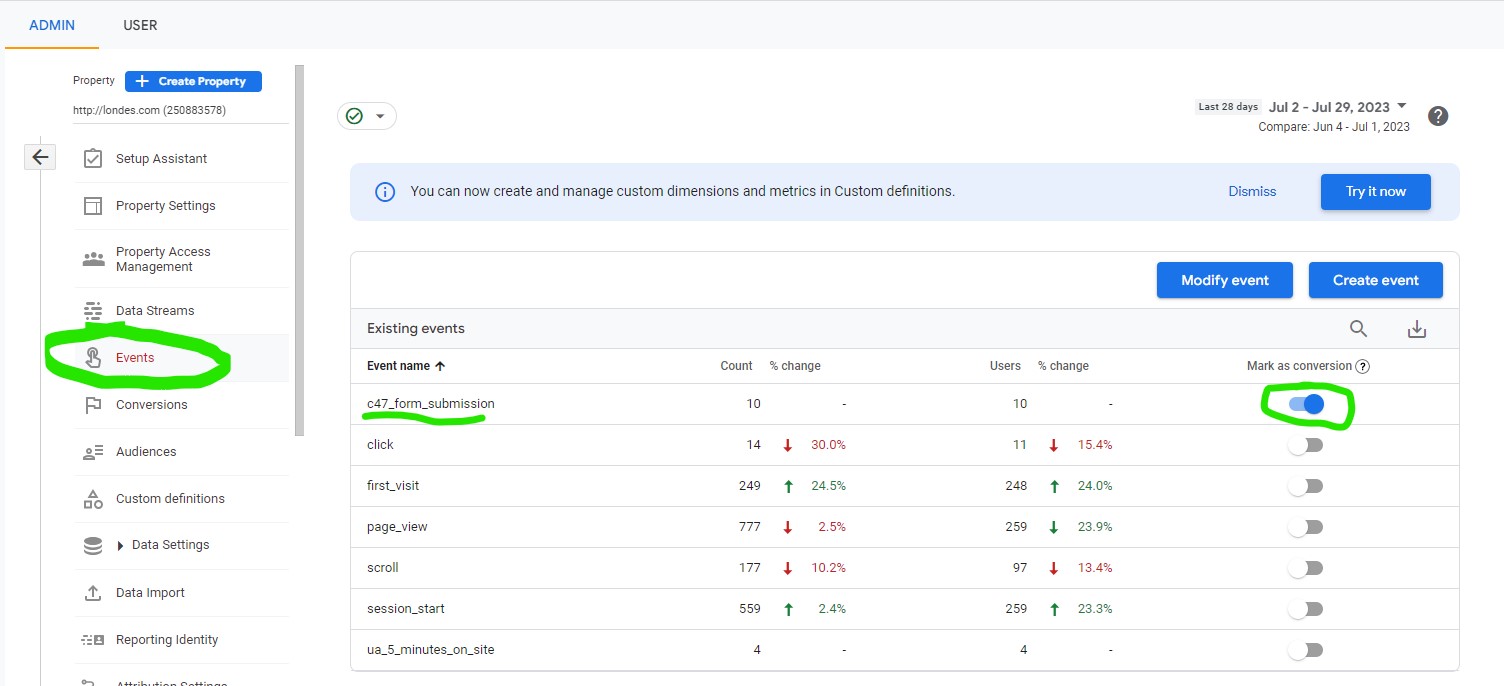
(click to enlarge)
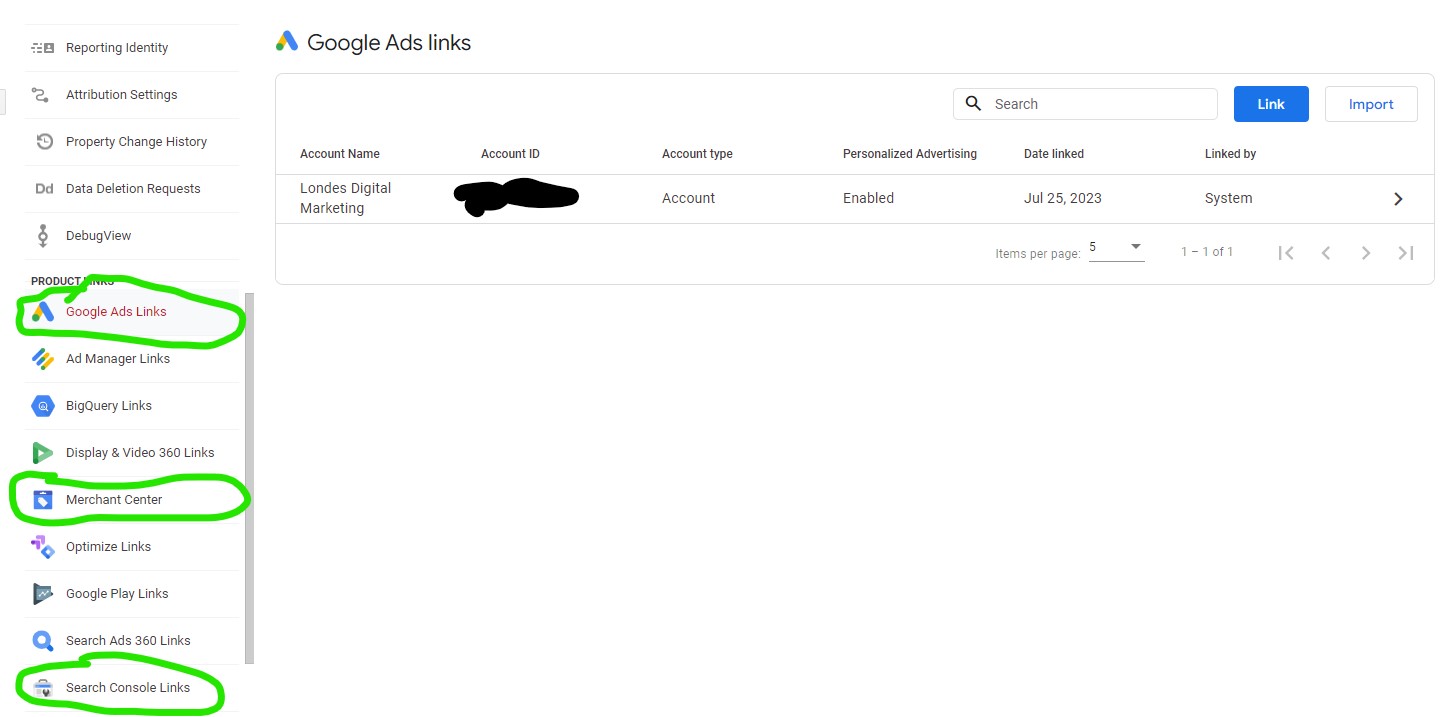
Step 7: Link GA4 to Google Ads & Other Assets
Once you’ve got everything set up nicely, link GA4 to other Google Assets so you can dig deeper into your data from different acquisition sources.
(click to enlarge)
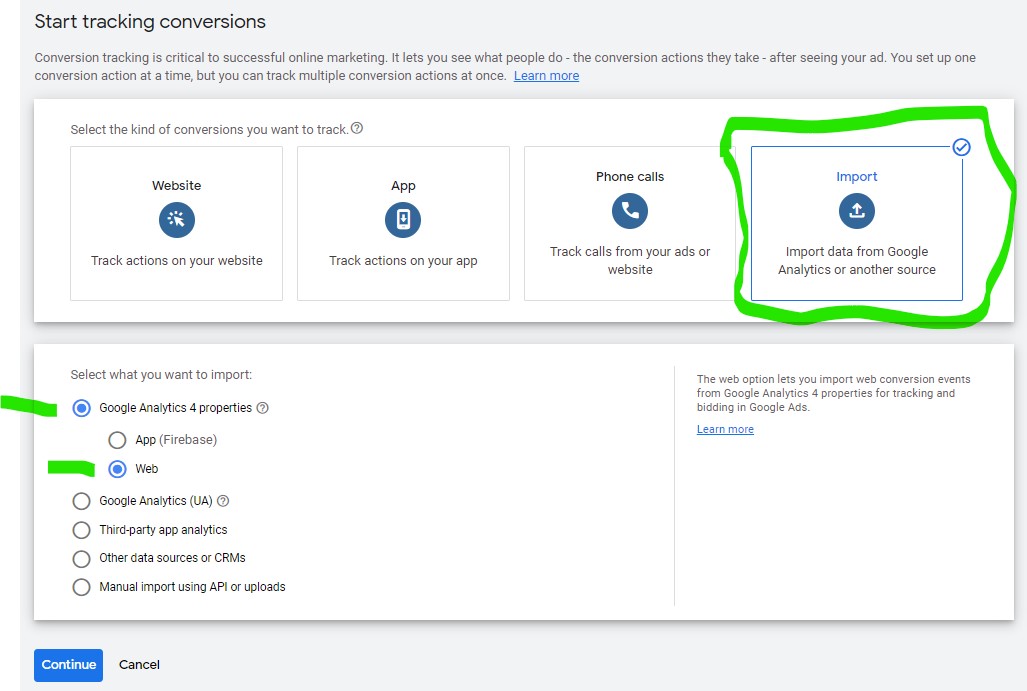
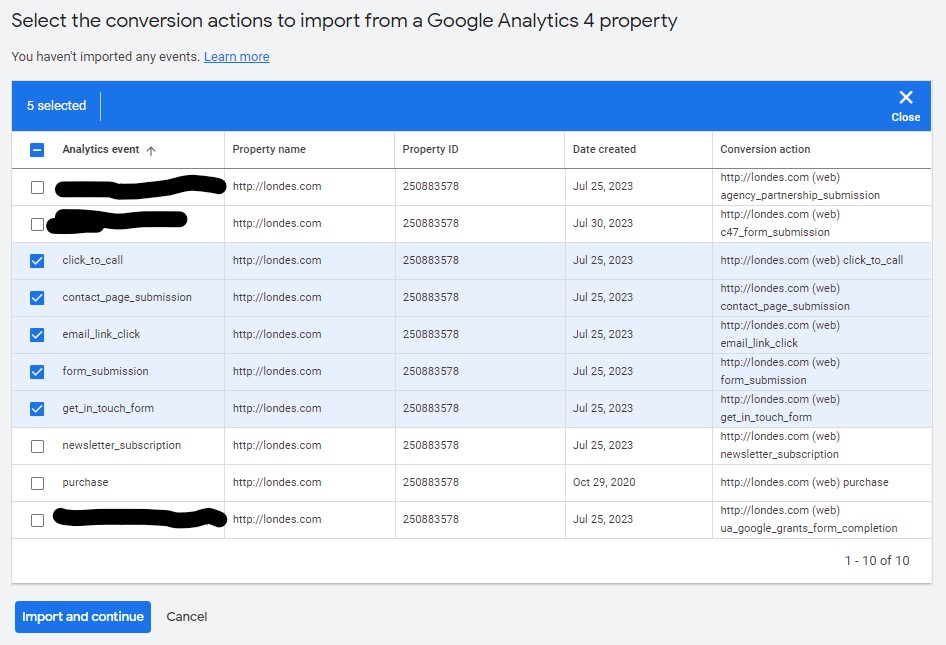
In particular, linking Google Ads to GA4 is important. You can set up Google Ads conversion tracking directly if you’d like (or maybe it was set up this way before), but you can also easily import your GA4 conversions into Google Ads. Here, you can see us import the 5 conversions we just created to our Google Ads account. To get to the screen below, sign into Google Ads and click Tools & Settings (upper right), then Conversions (under Measurement), then the big blue + New conversion action button.
(click to enlarge)
Then select the conversions that you’d like to import:
(click to enlarge)
Once you’ve imported conversions, you may want to categorize them by conversion type, assign values, or determine whether they are a primary or secondary conversion. That’s more of a job for your Google Ads manager, though.
Step 8: Basic Audience Setup
If you’re doing any kind of reporting or advertising based on user segmentation based on UA audiences, then that’s something that is very important to bring over to GA4. As part of a GA4 migration, we’ll recreate audiences in GA4 using the same logic they are set up with in UA. Barring that, we’ll just set up some basic audiences based on the events that were set up, general engagement, or segmentation that is likely important for your business. Clients with more advanced reporting or advertising needs will want to be more involved here, providing a “desired functionality” list very similar to what was requested for the event guide.

(click to enlarge)
Here is how we’d go about setting up an audience in GA4. You’re allowed to set up audiences based on a lot of different logic, but for this case we’ll use the 5 minute visit duration event that we set up for illustration purposes.
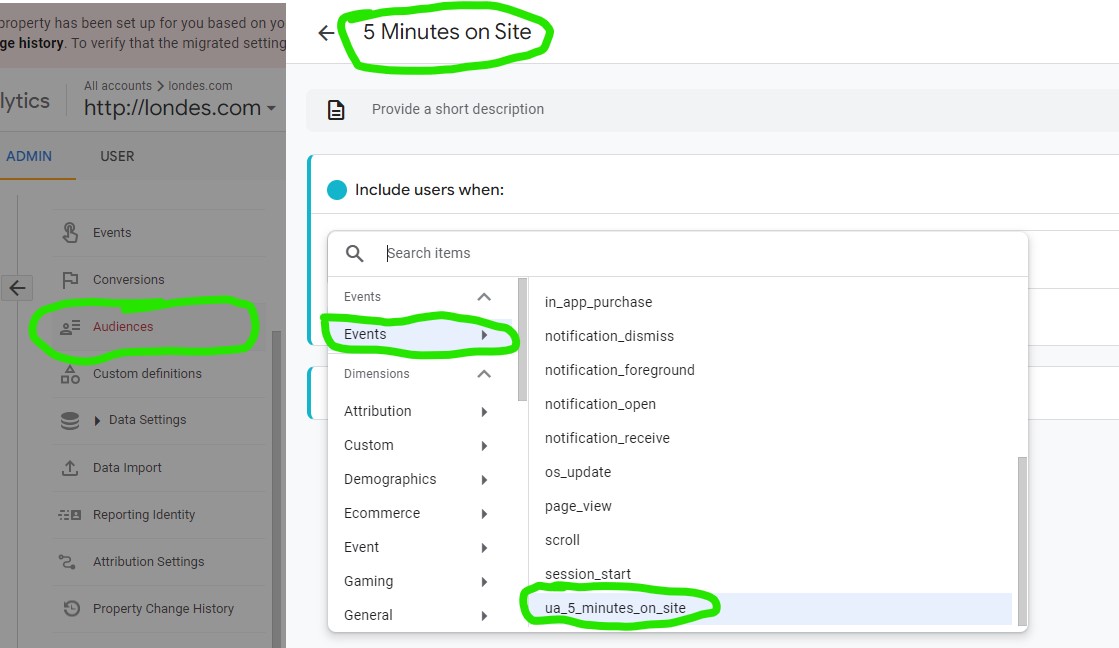
(click to enlarge)
The more remarketing advertising you do, and the more complex your business is, the more audiences you should have. They can be very valuable for messaging personalization for acquisition channels, as well as just for general performance and usability analysis on the website itself.
Step 9: QA & Tracking Verification
After you’ve installed all the tracking, it’s important you make sure it’s all working. Using the Google Tag Manager preview tool, you can confirm that tags are firing and should be collecting data as you implement the events. However, the details aren’t really revealed until you actually see the data come through in GA4. We like to go through and execute each event at least once, wait a day or two, and then go back and confirm everything is showing up in the GA4 console as designed.
We’ll update the Event tab on our Google Doc, color coding it based on the status of the tracking setup.
(click to enlarge)
In the example above, I’m pretending our Request a Consult form tracking isn’t working properly, and that we’re not sure about PDF downloads or Newsletter Subscriptions (because I guess we didn’t test it and none have come through yet). But assuming we have the power to set everything up, it should all be a very friendly green. If there end up being limitations from a certain CMS you’re using, or developers are struggling with implementation of something, then some of the events may remain red while we decide on pursuing other solutions.
(optional) Step 10: Create Reports Using Looker Studio
Everyone likes to complain about GA4, but it is able to collect data in a powerful way. The primary criticism is ease of use, maybe because everyone has been using UA for so long, but also because the data visualization in the platform is pretty annoying. In most cases, we prefer to pull data into Looker Studio (Google Data Studio) to visualize data and report results to clients. While this isn’t part of our standard GA4 setup or migration, often clients will want to have helpful visualizations of the data that is most important to them. Whether it’s an acquisition report, general usability report, or a top-line performance dashboard, we build custom reports for clients based on the data that is most important to them.
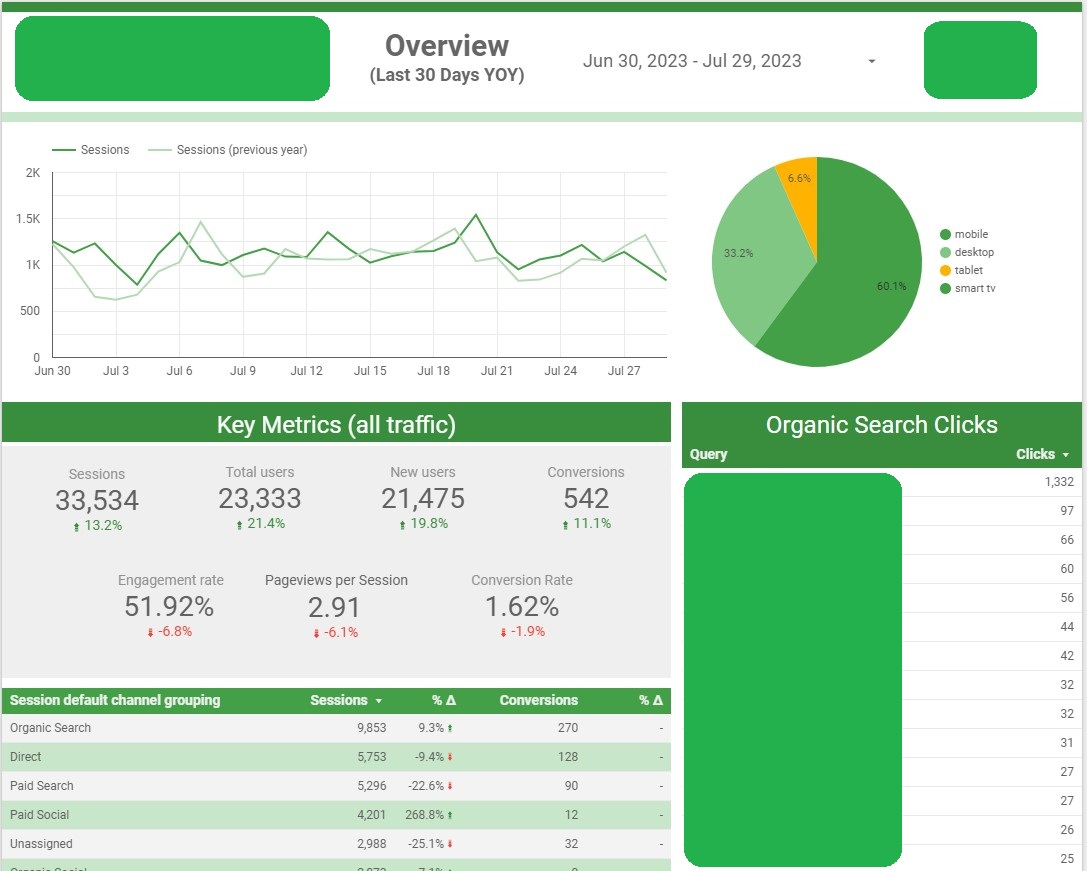
(click to enlarge)
Getting Started
Maybe you think all this looks pretty easy, maybe you think it looks complicated and expensive. Well, the good news is we do a lot of this and are very efficient about it. For local businesses and lead generation websites, we can often get a complete setup done for under $400. We also offer agency pricing if using us to set up tracking for each new launch is something you’d like to make part of your process.
Training, reporting, and advanced functionality is of course extra (all of this is billed based on the amount of time it takes us to set things up).
If you’re interested in getting a quote, please reach out to us now!
RELATED POSTS
- Establishing Client/Agency Relationships in Google Ads, Analytics, Search Console, and Tag Manager
- The Importance of Lead Scoring for Automated Bidding Strategies
- Migrating Website Scripts to Google Tag Manager
- Developing an Effective Naming Convention for Google Analytics Event Tracking & Virtual Pageviews
RELATED SERVICES
RELATED CASE STUDIES
SUBSCRIBE TO OUR NEWSLETTER
RELATED POSTS
-
Establishing Client/Agency Relationships in Google Ads, Analytics, Search Console, and Tag Manager
By Mike LaLonde
[this document was last updated in March 2019] Over the years, we've worked with a lot of clients who have had their accounts set up incorrectly. E...
continue... -
The Importance of Lead Scoring for Automated Bidding Strategies
By Mike LaLonde
When Google launched their automated bidding strategies years ago, they were terrible. We tested them frequently, and any competent managers on Manual...
continue... -
Migrating Website Scripts to Google Tag Manager
By Mike LaLonde
In my last post, I discussed how to develop an effective naming convention for Google Analytics tracking, keep it organized, and set up custom reporti...
continue... -
Developing an Effective Naming Convention for Google Analytics Event Tracking & Virtual Pageviews
By Mike LaLonde
This blog has been admittedly barren for over the past year, so this post is to serve as not only a resource, but also as evidence that we're still al...
continue...
RELATED SERVICES
-
Web Analytics
Web analytics provide mounds of data about your visitors. Proper measurement allows you to better understand traffic source and campaign performance t...
continue... -
CRO
Performance testing is the process of designing statistical tests on web elements to find the optimal combination to maximize ROI. From landing pages ...
continue...